Showing posts with label Microsoft Dynamics CRM 2011. Show all posts

Friday, January 15, 2016

Microsoft Dynamics CRM Errors And Solutions

Below are the errors faced in MSCRM and their solution.

1. Error while Publishing All Customization
    Solution: Try to publish individual components. You may face the same problem while publishing all the entities in bulk. In that case, publish only few entities once.


2. 'selectNodes is undefined or not an object' in Javascript
    Solution: Use getElementsByTagName("<tagName>") instead of selectNodes function.


3. Error creating/editing workflow process.

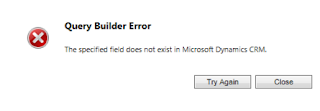
        Query Builder Error

        The specified field does not exist in Microsoft Dynamics CRM

    Solution: Open Deployment Manager and compare the installed CRM version with the version showing in front of your organization. If there is a mismatch, right click on the organization and upgrade.


4. Report Viewer Configuration Error in SSRS Report

The Report Viewer Web Control HTTP Handler has not been registered in the application's web.config file. Add <add verb="*" path="Reserved.ReportViewerWebControl.axd" type= "Microsoft.Reporting.WebForms.HttpHandler, Microsoft.ReportViewer.WebForms, Version=11.0.0.0, Culture=neutral, PublicKeyToken=89845dcd8080cc91" /> to the system.web/httpHandlers section of the web.config file, or add <add name="ReportViewerWebControlHandler" preCondition="integratedMode" verb="*" path="Reserved.ReportViewerWebControl.axd" type="Microsoft.Reporting.WebForms.HttpHandler, Microsoft.ReportViewer.WebForms, Version=11.0.0.0, Culture=neutral, PublicKeyToken=89845dcd8080cc91" /> to the system.webServer/handlers section for Internet Information Services 7 or later.

    Solution: 
  • Open web.config file in reporting server and add yellow marked tag to system.web/httpHandlers section.
  • To add the Report Viewer Web Control HTTP Handle for your application. Please take the following steps:
          - Open IIS Manager
          - Expand Sites node and select your site
          - Double click Handler Mappings feature
            Click Add Managed Handler in the Actions Pane to add the handler


5. Maximum Controls Limit Exceeded

The dashboard that you are trying to save has more components than the maximum number allowed: 10. Remove some components and try again.

    Solution: Login to the CRM server and open Window Powershell as Administrator. Then run the below commands one by one.

Add-PSSnapin Microsoft.Crm.Powershell
$setting = Get-CrmSetting -SettingType DashboardSettings
$setting.MaximumControlsLimit = 10
Set-CrmSetting -Setting $setting


6. Error importing solution

The solution file is invalid. The compressed file must contain the following files at its root: solution.xml, customizations.xml, and [Content_Types].xml. Customization files exported from previous version of Microsoft Dynamics CRM are not supported.


    Solution: We need to open the zip file and change the customizations.xml file.
Remove the nodes <SavedQueries>... </SavedQueries> and <visualization>... </visualization> and re-import the solution.


7. Action microsoft.crm.setup.server.registervsswriterserviceaction failed unable to start the requested service

Solution:
- To open Local Security Policy, click Start, point to Control Panel, point to Administrative Tools, and then double-click Local Security Policy.
- In the console tree, double-click Local Policies, and then click User Rights Assignment.
- In the details pane, double-click Log on as a service.
- Click Add User or Group, and then add the appropriate account to the list of accounts that possess the Log on as a service right.


8. Unable to browse for the active directory objects

While installing Microsoft Dynamics CRM, unable to browse and select the Organizational Unit.

Solution: Login with non default admin domain user account


9. Unable to start the vss write service

I was getting an error "could not load all isapi filters for site 'microsoft dynamics CRM' therefore" while restarting CRM Services.

Solution: "Microsoft Visual C++ 2013 Redistributable(x64)" was missing.


10. The MSBuild.ILMerge.Task task failed unexpectedly

I was getting an error "System.IO.FileNotFoundException: Cannot find ILMerge executable" while while merging the DLLs in Visual Studio.

Solution: The NuGet package requires ILMerge 2.13.0307 but I then upgraded it to the latest version (2.14.1208) which has moved the location of the tool to a nested tools folder. 
To solve it I deleted the ILMerge.x.x.x folder from the packages folder and edited the packages.config file to point to the old version and reloaded VS. 
Perhaps we could have a newer version of the task that targets the latest version? 
For your reference, click here.


11. User does not have send-as privilege

When CRM user try to send an email on behalf of other user, they are getting above mentioned error with Error Code -2147203059

Solution: Login as sending user à File à Options à Email tab à Select 'Allow other Microsoft Dynamics CRM users to send email on your behalf.'
Email creating(sending) user must be having privilege 'Send Email as Another User' under 'Business Management' tab in Security Role.


12. SqlException (0x80131904): The target principal name is incorrect. Cannot generate SSPI context

Whenever I reset my admin account password, I was unable to browse the CRM URL and getting the above mentioned error.

Solution: If you are hosting on IIS, make sure the password for AppPool has not changed.

If it has, then follow these steps:
Go to IIS
Click on Application Pools
Select the AppPool of your application
Right Click on your AppPool
Advanced settings
Identity
Update Password
Restart AppPool


13. TypeError: Unable to get property 'ClientVariables' of undefined or null reference

CRM Account form was not loading and I found the above script error in debug mode.

Solution: Security Role doesn't have read rights on the campaign entity.
Campaign entity is connected with Account/Contact entity. 
We never used Campaign entity in our project, CRM is internally tied with campaign entity.


14. Cannot open Sql Encryption Symmetric Key because Symmetric Key password does not exist in Config DB.

I was getting this error while sending an email, changing the user's BU and assigning the security roles.

Solution: In my case Data Encryption key was not activated. So, Activate the Encryption Key using below steps;
Settings à Data Management à Data Encryption à Enter the 'Current encryption key'.


15. Please select an account that is a member of the PrivUserGroup security group and try again

I was getting the this error while setting the CRM Data Encryption key.

Image result for Please select an account that is a member of the PrivUserGroup security group and try again

Solution: Add user account to PrivUserGroup in AD


16. Object reference not set to an instance of an object

While importing a CRM solution from Dev environment to UAT, import got failed with this error message.

Solution: There must be a new field created in Dev environment with the name which is already exist in UAT. Or the deleted a field and created a new one with same name but different data type in Dev and not deleted it from UAT. Finding out and deleting that field from UAT allowed me to import the solution successfully.


17. The SELECT permission was denied on the object 'tableName', database 'DBName', schema 'dbo'

I encountered this error while running SSRS report which contains an SQL query to read data from 'tableName'. By looking at the error message, it is clear that the account running reporting service doesn't have permission to SELECT data from 'tableName' table.

Solution: Run below query to grant SELECT permission to the account which runs reporting service.

GRANT SELECT ON DBName.dbo.tableName TO [domainname\reportServiceAccount]
GO

Tuesday, June 2, 2015

Auto Number: Record Locking in MSCRM Plugin

    We came across the scenario where custom Auto Numbering plugin generates the duplicate numbers for an entity when two users create the records simultaneously. The reason behind this is because dynamics only locks a record inside a transaction if we update it. However what we are doing here is retrieving the record and then updating it. So effectively the record will be locked just at the end of the plugin execution which is not very helpful indeed.
Below are the steps to illustrate this:

1.   First we are retrieving the config record which contains the prefix, last generated number and other details

2.   Then we are reading the last updated number value and other config details

3.   Then we are applying the logic to build the number

4.   Finally, we are updating both the config(to maintain the last generated number) and the entity record in context with the required values.

So it is possible that two plugins is being executed and both those plugins performed step 1 above (so they both retrieved a config record). So they both will have the same value for the “Last Number” field. Then they will both apply the logic in step 2 and 3. Finally the first plugin will execute step 4 and update the config record (this will lock the config record)  but it will finish execution immediately which will unlock the config record. So now the second plugin is executing step 4 but since it already has retrieved the old value so the update logic will be the same and it will override the config record with the same number instead of incrementing it.

So, we should update the logic in the plugin above to the following:

1.   First, do a fake update to the required config record. We don’t have to change  any values and we can just do       service.update(configRecord);

2.   Then we apply step 1, 2, 3 and 4 from the above logic.

Below is the sample code to show how to lock  the configuration record:


 1
 2
 3
 4
 5
 6
 7
 8
 9
10
11
12
13
14
15
16
17
18
19
20
21
22
23
24
25
26
27
// Get the record for which Auto Number to be generated
Entity  targetEntityRecord = (Entity)context.InputParameters["Target"];

// Fetch the configuration record
Entity configRecord = GetConfigurationRecord(service);

// If configuration record found, then do a fake update
if (configRecord.Id != Guid.Empty)
  service.Update(configRecord);
else
  throw new  InvalidPluginExecutionException("Config record not found.");

// Get the last generated number from configuration record
int  lastNumber =  Int32.Parse(configRecord.Attributes["new_lastnumber"].ToString());

// Increment the last generated number
lastNumber++;

// Build a number with your own logic
string autoNumber = string.Format("{0}-{1}", "PREFIX" , lastNumber);

// Set new generated number to both target entity and Configuration record
targetEntityRecord.Attributes.Add("new_name", autoNumber);
configRecord.Attributes["new_lastnumber"] = lastNumber;

// Update the Configuration record
service.Update(configRecord);


I would like to thank my friend Shakarchi Ethra for describing this Dynamics behaviour.

Friday, July 11, 2014

Integrate Twitter widget with MS CRM

You can see all the tweets of your twitter account in MS CRM. Below are the steps to be followed to integrate Twitter widget in MSCRM.

- Log on to your Twitter account.
- Click on Settings symbol (1) in twitter and select Settings.
- Select 'Widgets' in left panel.
- Click on 'Create new' button.
- Select 'User timeline' under 'Choose a timeline source' option.


A) Setting Widget properties in Twitter.

- Leave Username(2) as auto populated with your twitter user name, select 'Options'(3), 'Height'(4), 'Theme'(5) and 'Link color'(6) as your wish.
- Any changes you made in these properties are reflecting under Preview(8) in right side.
- Click on 'Create widget'
- Copy an HTML code(7) generated just below the Preview.
- Log on to MS CRM organization.
- Create one HTML webresource by adding the copied HTML code inside <body> tag.
- Create/Edit a dashboard to add newly created HTML webresource as a component in that dashboard.
- Save, Close and publish the dashborad.

- Go to that dashboard in CRM and you should be able to see all your tweets on CRM dashboard as in below image.


B) Twitter widget integrated with MS CRM dashboard

Thursday, June 19, 2014

Export to CSV without headers in SSRS

        In SSRS report we have an option to export report to many formats like Excel, CSV, PDF, Word and so on. In case of CSV export, we will get all the column headers in exported file. Some time we need CSV without column header. Below is the solution to get this done.

à Open rsreportserver.config file under C:\Program Files\Microsoft SQL Server\{INSTANCE}\Reporting Services\ReportServer in reporting server.
à Add below mentioned XML tags after <Extension Name="CSV"... />


 1
 2
 3
 4
 5
 6
 7
 8
 9
10
<Extension Name="CSV (No Header)" Type="Microsoft.ReportingServices.Rendering.DataRenderer.CsvReport,Microsoft.ReportingServices.DataRendering">
<OverrideNames>
   <Name Language="en-us"> CSV No Header</Name>
</OverrideNames>
<Configuration>
   <DeviceInfo>
      <NoHeader>true</NoHeader>
   </DeviceInfo>
</Configuration>
</Extension>


à Save the file.

 After this changes, run one report. Under export option in that report, you must be able to see the option 'CSV No Header' as in below image(a). And exported data will not contains any headers.


CSV No Header
a) Export to CSV with no header

Tuesday, December 24, 2013

Commands

        Below are the useful commands used in Microsoft related products like .Net, CRM,...

Click on the item below to go through the description about that.

Assembly Registration:

The Assembly Registration tool reads the metadata within an assembly and adds the necessary entries to the registry, which allows COM clients to create .NET Framework classes transparently.

If you’re running Visual Studio on Windows 7: Choose Start, and then choose All Programs, Microsoft Visual Studio, Visual Studio Tools, Visual Studio Command Prompt.
                    
regasm <DLLFilePath> /codebase /tlb

Ex: regasm C:\Testing.dll /codebase /tlb


ILMerge:

ILMerge is a utility that can be used to merge multiple .NET assemblies into a single assembly.

- Download ILMerge software from here and install in your machine.
- Goto Start, Run, cmd, OK.
- Goto C:\Program Files (x86)\Microsoft\ILMerge folder path and run below command.
                    
ilmerge /lib:<AssembliesFolderPath> <DLL1> <DLL2> <DLL3> <DLL4> /out:<OutputDLL>

Ex: ilmerge /lib:"C:\Program Files (x86)\Microsoft Visual Studio 10.0\Common7\IDE\PublicAssemblies" C:\FirstDLL.dll C:\SecondDLL.dll C:\ThirdDLL.dll /out:C:\FinalDLL.dll


Create Early Bound Classes:

CrmSvcUtil.exe is a command-line code generation tool for use with Microsoft Dynamics CRM 2011. This tool generates early-bound .NET Framework classes that represent the entity data model used by Microsoft Dynamics CRM. This tool is in the SDK download package in the SDK\Bin folder.

- Goto Start, Run, cmd, OK.
- Goto SDK\bin folder path and run below command.
                    
CrmSvcUtil.exe /codeCustomization:"Microsoft.Xrm.Client.CodeGeneration.CodeCustomization, Microsoft.Xrm.Client.CodeGeneration" /out:<OutputFile> /url:<OrganizationURL> /domain:<Domain> /username:<UserName> /password:<Password> /namespace:<Namespace> /serviceContextName:<serviceContext>
Ex: CrmSvcUtil.exe /codeCustomization:"Microsoft.Xrm.Client.CodeGeneration.CodeCustomization, Microsoft.Xrm.Client.CodeGeneration" /out:Xrm\Xrm.cs /url:http://MyCRM/MyOrg/XRMServices/2011/Organization.svc /domain:mscrm /username:administrator /password:mypassword123 /namespace:Xrm /serviceContextName:XrmServiceContext
For Online instance, you need to register your device as here.
                    
                    
CrmSvcUtil.exe /url:<OrgnizationURL> /out:<OutputFile> /username:<UserName> /password:<Password> /deviceid:<DeviceID> /devicepassword:<DevicePassword>
Ex: CrmSvcUtil.exe /url:https://myorg.crm.dynamics.com/XRMServices/2011/Organization.svc /out:GeneratedCode.cs /username:"myname@live.com" /password:"mypassword123" /deviceid:"9eqd9qip4meckbxhyi838gn3" /devicepassword:"543opae9itRWKO+U7fe+I3MRVANUyFFPcfDJYP5ItZo="


Device Registration:

CRM SDK has provided a tool to register your device. Goto Command Prompt then to the folder path SDK\tools\deviceregistration\bin\Debug. Run below command. This will register you device and give Device Username and Device Password.
                    
deviceregistration.exe /operation:Register


Saturday, April 6, 2013

Related records count in CRM 2011 chart

        Below is the screenshot of  Cases associated with Contact record(Fig. A). Here we can see two Cases for this Contact. In this exercise, the requirement is to display the related Case count for each Contacts in an Organization using charts.

Fig. A. Cases associated with Contact


Follow the below steps to create this chart in MSCRM2011.
  • Settings à Customizations à Customize the System à Entities à Case à Charts à New.
  • Name the chart à Select Case(Count) in Series and any field in Horizontal à Save & Close.
  • Select newly created chart à More Actions à Export Chart.
  • Open exported chart in Visual Studio.
  • Replace <entity> tag with below XML and Save.

1
2
3
4
5
6
7
8
9
<entity name="incident">
  <attribute alias="_CRMAutoGen_aggregate_column_Num_0" name="incidentid" aggregate="count" />
  <link-entity name="contact" from="contactid" to="customerid" alias="aa">
    <attribute name="fullname" groupby="true" alias="_CRMAutoGen_groupby_column_Num_0"  />
    <filter type="and">
      <condition attribute="statecode" operator="eq" value="0"/>
    </filter>
  </link-entity>
</entity>

  • In Charts, More Actions à Import Chart à Browse for updated XML file à OK à Replace à Close.
  • You can add this chart to Dashboard and which will looks like below(Fig. B).
Fig. B. Contact Vs Case count chart in Dashboard.

Friday, March 15, 2013

Dependent Picklist(Dynamic Option Set) in CRM 2011

             MS CRM 2011 doesn't have Out-Of-the-Box functionality to filter the option set values based on the value selected in another option set. We can implement this functionality using Javascript. Lets consider one example here. We have two option set fields called Country and City. City field has to be filtered based on the value selected in Country field. Below JScript code will do this functionality.

Prerequisite:

1. Create two optionset fields named new_country(with values say, India, USA and Srilanka) and new_city(with values say, Bangalore, Delhi, New York, Colombo, California and Hyderabad).
2. Create a JScript Webresource with the below code.
3. Attach this webrecource to call optionSetChanged() method on change of Country field and OnLoad of the form.
4. Configure getCollection() method to match the Cities with respect to Country.


 1
 2
 3
 4
 5
 6
 7
 8
 9
10
11
12
13
14
15
16
17
18
19
20
21
22
23
24
25
26
27
28
29
30
31
32
33
34
35
36
37
38
39
40
41
42
43
44
45
46
47
48
49
50
51
52
53
54
55
56
57
58
59
60
61
62
63
64
65
66
/************************
Functionality: To populate the picklist values based on the value selected in another picklist.
Field Name: new_country
Field Event: OnChange, OnLoad
***************************/

function optionSetChanged() {

    ///<summary>
    /// Change the dependent picklist values based on the value selected in the control picklist.
    ///</summary>

    var _collection = getCollection();
    var _selectedCity = null;
    var _cityOptionset = Xrm.Page.ui.controls.get("new_city");
    if (_cityOptionset != null)
        _selectedCity = _cityOptionset.getAttribute().getValue();
    var _cityOptions = _cityOptionset.getAttribute().getOptions();
    var _selectedCountry = Xrm.Page.getAttribute("new_country").getText();
        
    // If Country is empty, then clear the City field.
    if (_selectedCountry == "") {
        _cityOptionset.clearOptions();
    }
    else {
        for (var i = 0; i < _collection.length; i++) {
            if (_selectedCountry.toLowerCase() == _collection[i].Country.toLowerCase()) {
                _cityOptionset.clearOptions();
                for (var j = 0; j < _collection[i].Cities.length; j++) {
                    for (var k = 0; k < _cityOptions.length; k++) {
                        if (_collection[i].Cities[j].toLowerCase() == _cityOptions[k].text.toLowerCase()) {
                            _cityOptionset.addOption(_cityOptions[k]);
                            break;
                        }
                    }
                }
                break;
            }
        }
        if (_cityOptionset != null && _selectedCity != null)
            _cityOptionset.getAttribute().setValue(_selectedCity);
    }
}


function getCollection() {

    ///<summary>
    /// Creates and returns a collection of Cities with respect to their Countries.
    ///</summary>

    var _collection = new Array();
    var India_Cities = new Array("Bangalore", "Delhi", "Hyderabad");
    var India_obj = { Country: "India", Cities: India_Cities };
    _collection.push(India_obj);

    var Srilanka_Cities = new Array("Colombo");
    var SriLanka_obj = { Country: "SriLanka", Cities: Srilanka_Cities };
    _collection.push(SriLanka_obj);

    var USA_Cities = new Array("California", "New York");
    var USA_obj = { Country: "USA", Cities: USA_Cities };
    _collection.push(USA_obj);

    return _collection;
}


    This functionality can be tested by changing the Country field and check the values populated in City field. Result of this dependent pick list is can be seen here.

Country: India and Cities: Bangalore,Delhi & Hyderabad.

Country: USA and Cities: California & NewYork.

Friday, December 21, 2012

Hide 'Add New' button from ribbon

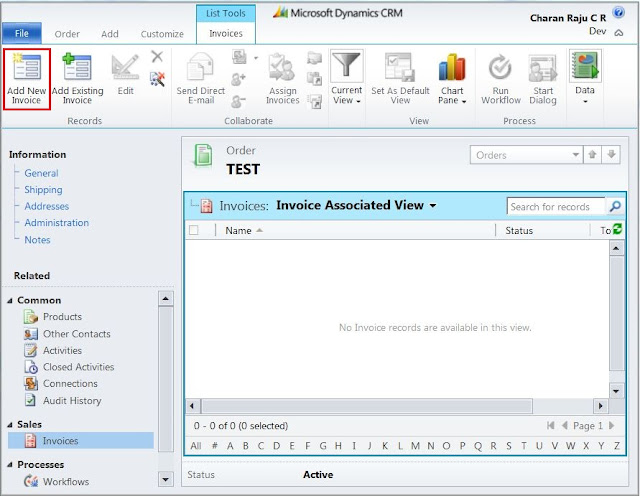
   Sometimes we need to remove Add New or Add Existing button from ribbon. In below image we can see the 1:N relationship between Order and Invoice. To remove Add New button from Invoice entity in Order record, we need to export Invoice entity.
Add New button in 1:N relation between Order and Invoice.


  • Open customizations.xml from exported solution.
  • Open invoiceribbon.xml from SDK(\SDK\samplecode\cs\client\ribbon\exportribbonxml\exportedribbonxml) and select <CommandDefinition> with Id="Mscrm.AddNewRecordFromSubGridStandard".
  • Paste the copied <CommandDefinition> inside <CommandDefinitions> in customizations.xml.
  • Insert new <DisplayRuleinside <DisplayRulesto hide Add New button(can be seen in below tags with Id="Mscrm.HideAddNewForOrder").

 1
 2
 3
 4
 5
 6
 7
 8
 9
10
11
12
13
14
15
16
17
18
19
20
21
22
<CommandDefinition Id="Mscrm.AddNewRecordFromSubGridStandard">
    <EnableRules>
        <EnableRule Id="Mscrm.AppendToPrimary" />
        <EnableRule Id="Mscrm.EntityFormIsEnabled" />
    </EnableRules>
    <DisplayRules>
        <DisplayRule Id="Mscrm.ShowForOneToManyGrids" />
        <DisplayRule Id="Mscrm.AppendToPrimary" />
        <DisplayRule Id="Mscrm.CreateSelectedEntityPermission" />
        <DisplayRule Id="Mscrm.AppendSelected" />
        <DisplayRule Id="Mscrm.HideAddNewForChildEntities" />
        <DisplayRule Id="Mscrm.HideAddNewForOrder" />
    </DisplayRules>
    <Actions>
  <JavaScriptFunction FunctionName="Mscrm.GridRibbonActions.addNewFromSubGridStandard" Library="/_static/_common/scripts/RibbonActions.js">
            <CrmParameter Value="SelectedEntityTypeCode" />
            <CrmParameter Value="PrimaryEntityTypeCode" />
            <CrmParameter Value="FirstPrimaryItemId" />
            <CrmParameter Value="PrimaryControl" />
        </JavaScriptFunction>
    </Actions>
</CommandDefinition>

  • Define <DisplayRuleunder <DisplayRulesin <RuleDefinitionsas below.

1
2
3
<DisplayRule  Id="Mscrm.HideAddNewForOrder">
    <FormEntityContextRule EntityName="salesorder" Default="true" InvertResult="true" />
</DisplayRule>

  • This <DisplayRulewill hide Add New button ONLY from Invoice which is related with Order.

Thursday, December 20, 2012

Add a ribbon button in CRM 2011


   The followings are the steps to be followed to add a ribbon button in CRM 2011.
1.Create a solution in CRM 2011.
2.Add button to an entity ribbon.

1.Create a solution in CRM 2011

  • Create new solution in CRM 2011(Settings à Customization à Solution à New)
  • Open created solution and add desired entity(Account in this example) and avoid adding related components. Save and close the solution.
  •   Select the solution and export it as Unmanaged.
  • Extract the zip file and open customizations.xml in Visual Studio.


2.Add button to an entity ribbon

  • In opened customizations.xml file, search for <Ribbondiff> tag.You can see the below block of tags if there is no ribbon customization for this entity.

 1
 2
 3
 4
 5
 6
 7
 8
 9
10
11
12
13
14
<RibbonDiffXml>
  <CustomActions />
  <Templates>
    <RibbonTemplates Id="Mscrm.Templates">
    </RibbonTemplates>
  </Templates>
  <CommandDefinitions />
  <RuleDefinitions>
    <TabDisplayRules />
    <DisplayRules />
    <EnableRules />
  </RuleDefinitions>
  <LocLabels />
</RibbonDiffXml>

  • In this example, we are adding a 'Close' button to an Account record ribbon to close the form.
  • We must have created 16X16 and 32X 32 Image webresources for Close button.
  • Replace <CustomActions /> tag with below XML tags.

1
2
3
4
5
6
7
<CustomActions>
  <CustomAction Id="Account.CustomAction.Close" Location="Mscrm.Form.account.MainTab.ExportData.Controls._children">
    <CommandUIDefinition>
      <Button Id="Account.form.Button.Close" Command="Account.form.Button.Close.Command" Sequence="34"
              LabelText="Close" ToolTipTitle="Close" ToolTipDescription="Close the form." TemplateAlias="o1" 
              Image16by16="$webresource:new_/Images/CloseButton16X16.png" Image32by32="$webresource:new_/Images/CloseButton32X32.png" />
    </CommandUIDefinition>
  </CustomAction>
</CustomActions>

  • Now we have to add command definition for Close button. CommandDefinition tag contains DisplayRules,  EnableRules and Actions for the button. Actions describes the action to be performed on click of button. And we must have created JavaScript web resource which has the function 'closeForm' to close the form.
  • Replace <CommandDefinitions /> tag with below XML tags.
  • Notice that, CommandDefinition Id must be same as Command in CommandUIDefinition in the above XML.

 1
 2
 3
 4
 5
 6
 7
 8
 9
10
11
12
13
14
<CommandDefinitions>
  <CommandDefinition Id="Account.form.Button.Close.Command">
    <EnableRules>
      <EnableRule Id="Account.form.FormStateNotNew.EnableRule"/>
      <EnableRule Id="Account.form.Field.EnableRule"/>
    </EnableRules>
    <DisplayRules>
      <DisplayRule Id="Account.form.WebClient.DisplayRule"/>
    </DisplayRules>
    <Actions>
      <JavaScriptFunction Library="$webresource:new_/Scripts/Account.FormClose.js" FunctionName="closeForm"/>
    </Actions>
  </CommandDefinition>
</CommandDefinitions>

  • Replace <DisplayRules /> in <RuleDefinitions> tag with below tags to define display rules when this button should be visible.

 1
 2
 3
 4
 5
 6
 7
 8
 9
10
11
12
<DisplayRules>
  <DisplayRule Id="Account.form.WebClient.DisplayRule"/>
    <OrRule>
      <Or>
        <CrmClientTypeRule Type="Web" />
      </Or>
      <Or>
        <CrmClientTypeRule Type="Outlook" />
      </Or>
    </OrRule>
  </DisplayRule>
</DisplayRules>

  • Replace <EnableRules/> in <RuleDefinitions> tag with below tags to define enable rules when this button should be enabled.


1
2
3
4
5
6
7
8
<EnableRules>
  <EnableRule  Id="Account.form.FormStateNotNew.EnableRule">
    <FormStateRule State="Create" InvertResult=="true" />
  </EnableRule>
  <EnableRule Id="Account.form.Field.EnableRule">
    <ValueRule Field="new_formcloseflag" Value=="true" />
  </EnableRule>
</EnableRules>


  • Save this XML file, Zip it, Import the solution and publish the entity.